Posts mit dem Label Projekte werden angezeigt. Alle Posts anzeigen

2020-02-17

BMPCC4K Control app - new users

Project history

  1. Previous project: name with link
  2. BMPCC4K Control app - Resolutions
  3. current posting
  4. next step
  5. Next project:


There is a surprisingly large number of new users for my
BMPCC4K app in January.

I guess I should get back to some of the items accumulating in the backlog.

Links:

2019-12-01

BMPCC4K Control app - Resolutions

Project history

  1. Previous project: LPG/CNG Price Reporter
  2. BMPCC4K Control app - URSA Mini Pro G2
  3. current posting
  4. next step: BMPCC4K Control app - new users
  5. Next project: designing a chain link tool library

Some updates on my BMPCC4K Camera Control App. (That  also supports the BMPCC6K, UMP and UMP G2)

Blackmagic never got around to adding the missing values to the "1.0 Video Mode" command of their bluetooth protocol. They even added new resolutions without adding the constants to support them via Bluetooth.

But I got a hint about a workaround for this issue and now all supported resolutions on BMPCC4K, BMPCC6K, UMP and UMP G2 should be supported.
You can also only select resolutions that fit the currently selected frame rate

Links:

2019-09-29

Bonaverde - Emulating NFC cards

Project history

  1. old posting: Bonaverde: testing Henry Hück
  2. current posting
  3. next posting: 

The problem

For my Bonaverde "Berlin" machine,
I still have some green beans in the large 500g bags around.
They contain no NFC tag and where shipped to Kickstarter backers.

Since serveral weeks and 3 app-updates the myBonaverde app no longer offers many types of coffee beans including these for roasting.
It also has many other issues with the list such as listing the same entry 3-5 times, listing lots of 80g profiles when having 50g selected,....
Support couldn't find the issue yet. (Yes, uninstalling does NOT help in any way.)

NFC to the rescue

So I decided to have a look at their NFC tags. They work offline after all.
I do have a number of used-up single-use cards of the typed of coffee.

The ISO 14443-3A compatible "NXP MIFARE Ultralight EV1 - 48 Byte" cards with 20 memory pages of 4 byte each.

Card format

I quickly found out the following facts:
  • sector 00 - unique ID by Mifare. Doesn't matter.
  • sector 01 - still UID
  • sector 02 - card type and other bits we don't care about
  • sector 03 - these are OTP = one time programmable. 
    • Single use cards are made single-use by setting ALL bits 1.
    • They can be reset by emulating the same cards with these fuses set back to 0.
    • The same mechanism is used for single-use air filters.
  • sector 04 - always the same content
  • sector 05 - byte 2 is different for NFC tags on air filters.
  • sector 06 - byte 3 indicates the type of card. 
    • 56=air filter 
    • A2=coffee changers badge
    • AC=single use coffee pouch
    • update: AE=Advent_ure#4
    • update: B2=roast only, roast and grind
    • update: B5=grind only, brew only, 80g universal tool
    • update: B6=Advent_use#14 slow roast(+brew)
    • ...
  • sector 07 - always the same content
  • sector 08 - byte 0 is different for NFC tags on *unused* air filters
  • sector 09 - byte 2 is different for NFC tags on air filters.
  • sector 0A - byte 1 is different for NFC tags on air filters
  • sector 0B - byte 2+3 differ. 
    • meaning unknown
  • sector 0C - always 0x00000000
  • sector 0D - always 0x00000000
  • sector 0E - always 0x00000000 
  • sector 0F - first byte differs
    • meaning unknown
  • sector 10 - CFG 0 (MIRROR / AUTH0), content given by Mifare
  • sector 11 - CFG 1 (ACCESS), content given by Mifare
  • sector 12 - PWD0 - PWD3 always 0x00000000
  • sector 13 - PACK0 - PACK1 always 0x00000000
The description of sector 7-0F does not refer to the card types marked as "update:". I didn't have the time to have a closer look at these yet. 

Emulation?

I can not emulate these types of card using my Android phone. But you can get card emulators with a switch to make sector 03 writable.
I got one, set up with a firmware emulating the 48 byte version of the EV1 cards.
I used the MIFARE++ Ultralight app to write to one of these emulators.
The NFC Tools app (pro) app looked promising but can't write what it can read. It can only write NDEF recordd.

Implications

It's your own coffee machine.
You can't do anything unsafe with this.
You purchased the green beans from Bonaverde to get the NFC tag in the first place.
You can't get the beans matching the bean-specific roasting profile referenced in the NFC tag anywhere else.
So I see no problem in sharing this absolutely trivial bit of information.

TBD

I could not find out how the roasting profiles are stored.
According to the FAQ there are 6 roasting degrees. 
The content is too small to store a list of time+temperature values forming a the curve of a roasting profile. So my guess is that there is a fixed or updatable table of profiles in the machine and the card just selects it. Or the card contains a single pair of duration+intensity.

Links:

2019-06-27

BMPCC4K Control app - URSA Mini Pro G2

Project history

  1. Previous project: LPG/CNG Price Reporter
  2. old posting BMPCC4K can select 4K and 4.6K resolutions
  3. current posting
  4. BMPCC4K Control app - Resolutions
  5. Next project: designing a chain link tool library

Finally a user sent me the idenfification string for the URSA Mini Pro G2.
Blackmagic does not document the exact strings the cameras use in Bluetooth to identify themself.

I added support for the G2 to behave just like the URSA Mini Pro in the latest Beta release.

Links:

    2019-06-12

    BMPCC4K can select 4K and 4.6K resolutions

    Project history

    1. Previous project: LPG/CNG Price Reporter
    2. old posting BMPCC4K app gets presets
    3. current posting
    4. next step: BMPCC4K Control app - URSA Mini Pro G2
    5. Next project: designing a chain link tool library


    In firmware 6.3 Blackmagic finally offers a way to select the different 4K and 3K/4.6K(UMP only of cause) resolutions via Bluetooth.
    So I'm about to add these to my "BMPCC4K control" app.

    Status


    Update (2019-06-17): I tried it with the BMPCC4K and firmware 6.4 and it didn't work. I'm in contact with Blackmagic. My suspicion is that this was only rolled out for the URSA and not the BMPCC4K yet.

    Get Support

    If you have any issues with the app, please contact me using the email address mentioned in the Play Store. If you don't speak up, I can't help you.
    Also, reviews in Play Store are not a chat. They are product reviews. Not a place to ask questions and expect an answer.

    Connection Issues

    If you can't get a connection via Bluetooth or can't find your (already paired) camera, it's often a crappy Bluetooth Stack in your phone.
    In that case rebooting the phone is your best hope. Bluetooth and especially Bluetooth Low Energy is not Googlen's or most manufacturer's highest priority when it comes to Android. The API to access BLE is already pretty crappy compared to most other Android APIs and the underlying implementation is grown as more and more things have been added to the different versions of the Bluetooth standards. All of these versions the phone has to support at the same time. Nothing an app can do about that. Only Google and the phone manufacturer can fix their bugs and I can fix mine.

    Stability

    On a positive note, there is still not a single crash or "application not responding" automatically reported in any version of the app installed via Play Store since late 2018.

    Links:

      2019-05-18

      BMPCC4K app gets presets

      Project history

      1. Previous project: LPG/CNG Price Reporter
      2. old posting New BMPCC4K firmware - this time with BRaw
      3. current posting
      4. next step BMPCC4K can select 4K and 4.6K resolutions
      5. Next project: designing a chain link tool library


      I did not have much time to do anything on my BMPCC4K Camera Control - Android App lately but I did manage to publish a new, public beta version today that has a new tab for storing and recalling the current camera settings as presets.

      My camera is currently used on a film set, so it will take me until at least next week to properly test this Beta to offer it as a stable release.

      Links:

          2019-03-06

          New BMPCC4K firmware - this time with BRaw

          Project history

          1. Previous project: LPG/CNG Price Reporter
          2. old posting New BMPCC4K firmware
          3. current posting
          4. next step: BMPCC4K app gets presets
          5. Next project: designing a chain link tool library


          Again we get a firmware update (6.2) for the Blackmagic cameras.
          This time it finally includes the BM-Raw support.
          However they had to remove the support for Cinema-DNG.

          I'll add the ability to select BM-Raw to the BMPCC4K Camera Control - Android App at once.

          Update: The new Android app is released

          However there is one issue. There is no way to determing what the camera supports.
          This was already the case with the supported resolutions on the URSA Mini Pro.
          So either I add BMraw and drop CDNG and cameras with older firmwares will loose the ability to have Cinema-DNG selected or add both and on older and newer camera firmware's there will be unsupported but selectable options.
          Here's the answer from Blackmagic:

          Hi Marcus,Unfortunately there is no facility to read back the Camera version with the Camera Control protocol, as such it is not possible to determine whether Cinema-DNG is supported or not. I have put in a change request to add this feature in a future release, but this doesn't help you with this request.Kind Regards(name redacted)
          I'll also see if 4K and 4.6K  resolutions can not be set via Bluetooth. The protocol documentation is still in a state of October last year, so new constants are defined  for these resolutions but I can guess and try.
          BTW:


          • I am offering the app at half the price for a week only (until 2019-03-08). Including all future updates.
          • There has not been a single crash and not a single "application not responding" since as far as Google Play Store can go back and not a single one in the last 2 app versions ever.

          2019-02-05

          New BMPCC4K firmware

          Project history

          1. Previous project: LPG/CNG Price Reporter
          2. last step: Mysterious crash
          3. current posting
          4. next step: New BMPCC4K firmware - this time with BRaw
          5. Next project: none


          Looks like there is a new camera firmware for the Blackmagic Pocket Cinema Camera 4K.

          Since the Bluetooth protocol I used to write my "BMPCC4K Camera Control" Android app did not support some features of this camera yet. I'll give it a try and see what has improved....

          Stay tuned!


          Stable Releases:

          Open Beta Test: (early access to improvements)


          Links 

          2019-02-03

          Parametric wire dispenser


          At the moment Youmagine is pretty much broken in Firefox and in Chrome due to the choice of company they got their SSL certificate from.

          However I still published a new accessory for my soldering workspace.
          A simple wire dispenser that with parameters for the number and size of spools.


          2018-12-16

          Mysterious crash

          Project history

          1. Previous project: LPG/CNG Price Reporter
          2. last step: Android App for Blackmagic Pocket Cinema Camera 4K
          3. current posting
          4. next step: New BMPCC4K firmware
          5. Next project: designing a chain link tool library

          The BMPC4K app I wrote has exactly 1 crash on 2 devices in Play Store.
          However I'm completely puzzled by the stacktrace.
          It's not made easier by the fact that I can't reproduct the crash since it happens on 2 user's phones that I have no access to.

          All my own code is in the biz.wolschon... -packages.
          This crash is entirely in the Wear OS library by Google.
          I'm using
          implementation 'com.google.android.gms:play-services-wearable:16.0.1'
          16.0.1 is indeed the latest and greatest version available at this time.
          Since Google has obfuscated it's libraries, a search for other people with this issue in that line of code turns up nothing.

          It seems to happen at Fragment -creation time. However I'm not using any fragments from GMS. At least I'm not aware of any.
          All I can try is to move from the support library 27.1.1 to 28.0.0 with a 28 target SDK. This mandates some unrelated changes. None of them look like they should affect me.

          Update: I just came back, tested that the new, public beta version works and uploaded it to Play Store. Let's see if the crash still happens and if so, something shows up in the Stacktrace that hints to a cause this time.

           Links:

          2018-12-14

          LPG Preismelder Android app updated again

          Project history

          1. Previous project: none
          2. last step: LPG Preismelder Android app updated
          3. current posting
          4. next step: none
          5. Next project: Android App for Blackmagic Pocket Cinema Camera 4K

          Android 9 will no longer allow unencrypted HTTP communication.
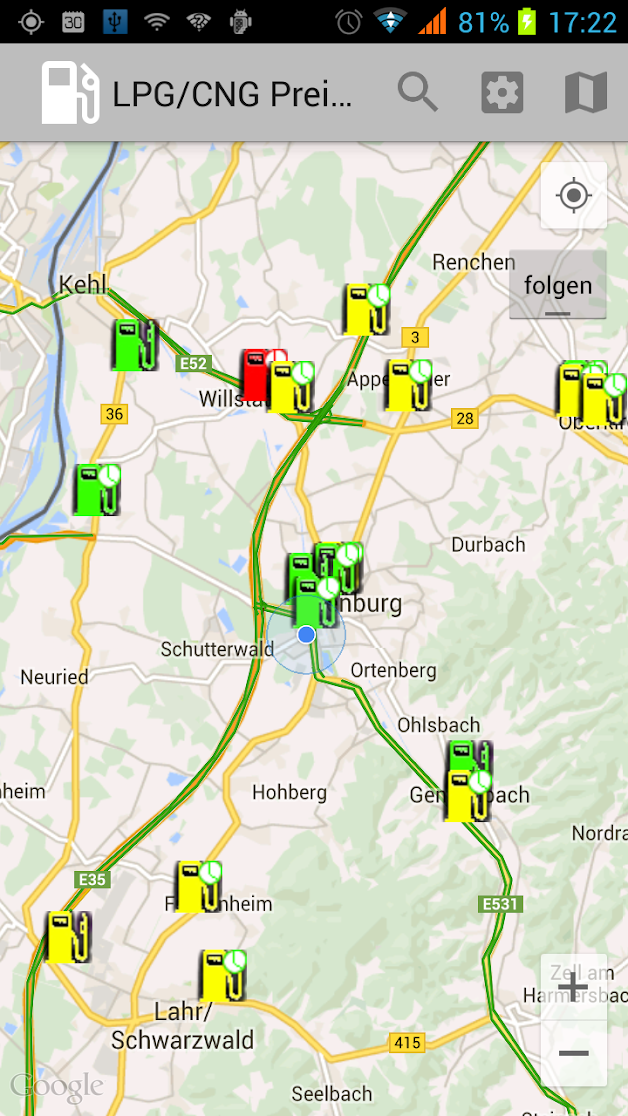
          So I had to pull out my old "LPG Preismelder" fuel station app for GPL and CNG fuel stations in Europe.
          It is a simple app. It still works fine.
          However nowadays Google Play Store no longer allows the old target SDK
          and Android Studio does't like the old Build Tools.
          So I had to update them and consequently add support for permissions that are no longer granted at download-time.
          Also the Google Maps API has changed a lot and it is no longer possible to just ask the Map-Fragment for the map and perform updates (e.g. set the location). All this now has to be done asynchronously.

          This did introduce a small number of crashes for rare cases, thus ruining my "max 1 crash per year at 1000 users" record.

          Links:

          • App on Google Play

          2018-12-12

          Rotacy CNC: That damn earthing again

          Project history

          1. Previous project: TravelCNC
          2. previous step: Problem with optical input switches
          3. current posting
          4. next step
          5. Next project: designing a chain link tool library

          When I assembled my newest DIY CNC mill on a piece of wooden OSB board... what could you possibly forget?
          Right.
          Wood is not conductive.

          Everyhing is build super clean.
          Crimped using the proper tools.
          Signal power and signal ground distributed using proper DIN rail blocks.
          Stepper drivers stronger then the actual power supply, steppers and forces needed.
          ...
          Strangely enough I machined an entire part in perfect finish for a week before any issues showed up.
          Then the A axis stepper starting moving on it's own and jittering. But only it it had already moved before. Not related to the spindle running or not.

          Problem 1: wrong power supply

          I had way too much power provided to my stepper drivers.
          48V supply because the drivers where advertises as 8-50V input voltage.
          Actually however where 8-42V with 50V being the absolute maximum rating.
          The dealer overstated the capabilities of the driver.

          Problem 2: Earthing

          This did not solve my problem.
          It needed a borrowed oscilloscope to figure out that I simply forgot to connect my giant A-axis gear box, sitting on the OSB base-plate to PE.
          The power supplies (not the spindle) for the strong steppers seem to radiate a ton of EMI into the huge metal block that is the A axis. Static buildup from the gears inside and from machining plastic for days on end surely did not help either.
          Since the power flowing from the motor to the motor driver caused the "work" LED on the driver to blink, I searched for hours where the supposed stray inputs to the driver came from. Not realizing that this came from the output of the drivers and not the inputs.

          I had the same issues already with my Chinese 6040 CNC (all Aluminium but designed with no regard to earthing large metal parts and thus the steppers they connect to).
          Seems I had to learn that lesson again.

          Parts used

          2018-11-07

          Android App for Blackmagic Pocket Cinema Camera 4K

          Project history 

          1. Previous project: LPG/CNG Price Reporter
          2. last step: none
          3. current posting
          4. next step: Mysterious crash
          5. Next project: none

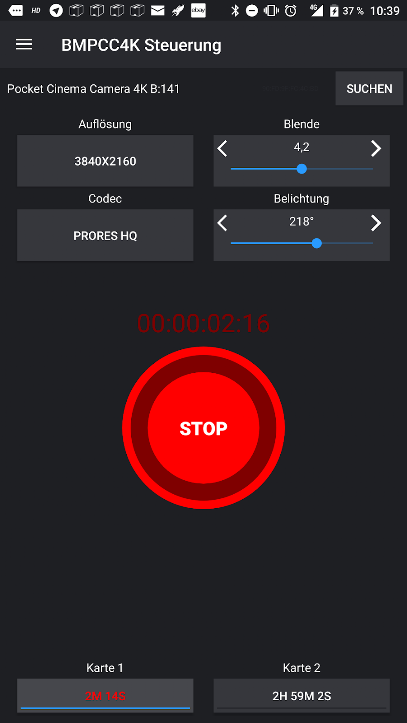
          Screenshots

          Minimal start screen while recording...
          ...while idle...

          ...and before a connected to a camera.
          Very early version of the focus slider.

          Android Wear smartwatch.
          Selection of some settings values.

          Intention


          I've just written an Android app that is capable of starting and stopping a recording on the Blackmagic Pocket Cinema Camera 4K  (BMPCC4K) and the
          URSA Mini Pro (no wireless focus supports on the EF mount version) as well as the
          URSA Mini Broadcast.

          It can
          • Start/Stop a recording remotely
          • Start and Stop using an Android Wear smartwatch (for Vloggers)
          • display a live timecode, remaining time on storage medium and the most important parameters
          • pull wireless live focus and zoom via touchscreen
          • store and recall 3 combinations of focus and zoom with a smooth transition
          • change parameters - codec, resolution and frame rate (some values not offered yet)
          • edit metadata

          I am still adding features.
          I plan to
          1. allow syncing the GPS-time of the phone to the camera(s)
          2. allow to start/stop recording on multiple cameras e.g. for multicam interviews. (No idea for a good user interface yet. Proposals?)
          3. Support the Panasonic GH5 / GH4R / GH4 camera via Wifi in addition to Blackmagic cameras via Bluetooth Low Energy
          Limitations beyond my control:
          • My idea to also display audio meters will not work because the camera does not seem to send these via Bluetooth.
          • DCI 4K and 4.6K resolutions can not be selected because Blackmagic forgot to define the values in the protocol 
            • Support ticket DEV-144. These will be fixed in a future firmware.
          • Also the camera does not seem to report the selected storage medium correctly.
            • I'm getting a small CFast card to experiment with this.


          Stable Releases:

          Open Beta Test: (early access to improvements)

          Pricing

          Yes, I did put a reasonable price tag of 10€ on it.
          That's 20% the price of a power-cable set or 14% of an original Canon-battery or a meal at McDonalds.
          Sales tax gets 19% of the shown price (depending on the country) and Google a cut of 30%. So it's just about 6,30€ that actually end up in my pocket to pay for small expenses.

          Privacy Policy

          (This is required by Google Play Store.)

          This app does not collect, use or distribute any kind of personal data.
          End of story.

          Updates

          version "1.2.37" (01.12.2019)

          • offer all resolutions on all cameras
          • only offer resolutions matching the current sensor frame rate

          version "1.2.36 Beta" (13.07.2019)

          • bugfix in preset selection
          • BMPCC6K support

          version "1.2.35 Beta" (06.07.2019)

          • show valid shutter angle values if camera is set to shutter time

          version "1.2.34 Beta" (27.06.2019)

          • Added support for the URSA Mini Pro G2

          version "1.2.34 Beta" (16.06.2019)

          • BMPCC4K: Ability to select DCI 4K with Camera firmware 6.3 or newer (Blackmagic FINALLY fixed this)
            • Tested and DOESN'T WORK YET (at least not the way it was documented). Am currently in contact with Blackmagic.
          • URSA Mini Pro: Ability to select Anamorphioc 3K, DCI 4K, 4K 16:9, 4.6K 1.4:1 and 4.6K resolutions (untested, that's why it's beta)
          • Dropped the "new firmware" note in the BM-RAW codecs
          • Text "connection lost" is no longer obscured by the card-slot buttons

          vesion "1.2.33" (01.06.2019)

          vesion "1.2.31 Beta" (18.05.2019)

          vesion "1.2.29" (16.03.2019)

          • Permissions prepared for Android 'Q'
          • focus transition screen published as non-beta

          version "1.2.24 Beta" (07.03.2019)

          • Experimental, programmable focus tansision screen with duration and ease in/out.

          version "1.2.23" (07.03.2019)

          • Fixed black icon colors in newer Android versions
          • Fixed autofocus button overlapping focus rocker on some screen sizes

          version "1.2.22" (07.03.2019)

          • Blackmagic raw selectable on Pocket Cinema Camera 4K (since firmware 6.2)
          • Cinema DNG is marked as "old firmware"

          version "1.2.21" (07.02.2019)

          • Tested with Firmware 6.1. Sadly Blackmagic still did not add "DCI 4K" and"4.6K" as selectable resolutions
          • Support for lenses with no aperture control by the camera.

          version "1.2.19" (28.12.2018)

          • Minor fix with the record start/stop command to be compatible with more strict Blackmagic camera firmwares.
          • Fixed white on white text for dialog buttons in Android 8
          • Aperture and shutter angle can be controlled
          • Only slots with a card in it can be selected
          • Better fit for slim displays
          • Settings become 2 screens to be less cluttered

          22.12.2018

          • I finally figured out what I did wrong in decoding f-stop values. Aperture control is coming after the holidays.

          Version "1.2.13" (17.12.2018)

          •  Can display and change active storage card

          15.12.2018

          • On this day I'll hopefully see the very first money from the November sales in Google Play Store. It should actually pay for 35% of my Samsung T5 SSD (without the cage mount) practically required to do anything useful with this camera. The 30% cut for Google after the 19% cut for sales tax is quite heavy. Given my actual hourly wage this side project will never turn any profit in a hundred years but that's okay. It's fun.

          Version "1.2.11" (10.12.2018)

          • For Some reason Play Store shows this version as "1.2.1" instead of "1.2.11".
          • I manually fixed the old name still shown in Play Store.
          • Fixed crash on k6000 Plus (Android 8.0) for Bluetooth device with no name
          • Unknown camera models can be reported for addition via email

          Version "1.2.10" (6.12.2018)

          • Fixed crash on Pixel 2 (Android 9) when aborting a scan for bluetooth devices in range
          • Nicer display of remaining time on storage medium
          • >M-rate framerates selectable (29.97,...)

          Version "1.2.7" (24.11.2018)

          • Yes, on the same day as the earlier 1.2.6.
          • Reverse engineered the storage-related broadcasts. It now displays the remaining time on card slot II.
          • I'm trying to get my hands on a CFast card to try card slot I.

          Version "1.2.6" (24.11.2018)

          • I got a new icon drawn by a facebook user. Thanks a lot!!!
          • I also changed the name from "BMPCC4K Record Button" to "BMPCC4K Control" because the app does so much more nowadays"
          • I was able to add entering metadata.

          Version "1.2.4" (20.11.2018)

          • Power zoom rocker and a zoom slider added.
          • Also you can store and recall 3 focus+zoom positions now.

          Version "1.2.1" (15.11.2018)

          • Yes, on the same day as the earlier 1.2.0.
          • Wireless follow focus slider added.

          Version "1.1.1" (13.11.2018)

          • Huge improvements to my Bluetooth Low Energy stage-engine. Searching for the camera(s) is MUCH faster now

          Version "1.0.4" (12.11.2018)

          • I figured out how to detect someone on the camera starting a recording instead of starting it via the app (and by extension the case of a recording already running when the app is started).

          Links 

          2018-07-08

          Rotacy CNC: Problem with optical input switches

          Project history 

          1. Previous project: TravelCNC
          2. previous step: Building a rotacy CNC milling machine
          3. current posting
          4. next step: That damn earthing again
          5. Next project: designing a chain link tool library

          The situation:


          I'm trying to replace my microswitches as end-stops + homing sensors with an optical sensor for homing. (and keep the mechanical switches as end stops.)

          I'm using a TCST2103 photointerruptor.
          On the Emiter-side I use a 220 Ohm resistor to my common +5V to limit the current.
          On the Detector-output side I use a 10 KOhm pulldown.
          Emiter and Detector -inputs are on +5V.
          Between the Detector-output and the 10KOhm I get my signal.

          I meassured my VCC to be between +4.78V and +4.80V with allother loads connected to it.

          The signal goes into an AKZ250 USB motion card that works with MACH3 to run my CNC milling machine.

          (The sketch also shows the internal logic from the schematics of the USB board. It uses a TLP521-1 photocoupler, a 330Ohm resistor, the mentioned LED and a 4.7Kohm resistor on each input pin.)

           The problem:

          When I hit "reset" in MACH3 with the photointertutor not interrupted, everything is fine. The input-LED on the USB board is off and the diagnostics page in MACH3 says the input is not active (high).

          When I interrups the photointerruptor, the input-LED goes off and MACH3 says the input is active (low).

          HOWEVER: When  I chease to interrupt the photointerruptor, the LED goes on again BUT MACH3 says the input stays active.
          Until I tell MACH3 to reset.

          Links:


          Update:
          I found my 220 Ohm resistor on the (E)mitter side too low.
          180Ohm should have been used to reach the nominal 20mA on the emitter LED. 
          This way we only get 15mA.

          The graph "Fig. 8 - Collector Current vs. Collector Emitter Voltage" in the TCST2103 data sheet shows that this means only about Ic=2mA instead of about 4mA on the (D)etector output side.
          (Apparently enough to still light up the red status LED just as bright as the others. These red ones nominally want 16mA but do work with less.)

          The TLP521-1 inputs recommends 16mA (max 25mA) but gets 4mA.
          This means only 4 instead of more then 10mA on the TLP521-1 output. (The recommend 16mA input would result in 40mA)
          So I *guess* from studying just the data sheets, that way too little current get to the digital input that is behind the optocoupler on the AKZ250 USB motion control board.

          Update 2:
          I found THIS mention and it seems that may pull down resistors may be too large.

          Update 3:
          Or my 10K pulldown may be too large (correct for 3.3V) for 5V.

          2018-05-22

          Building a rotacy CNC milling machine

          Project history

          1. Previous project: TravelCNC
          2. current posting
          3. next step: Problem with optical input switches
          4. Next project: designing a chain link tool library

          Before

          At the moment I have a heavily modified Carving-CNC/OmioCNC 6040Z+S80 machine from 2012 with an automatic tool changer and an 80mm 4th axis.

          However the 80mm chuck and the 150mm clearance below the gantry of the 600x400x150mm machine has proven to be quite a limitation.
          Even if you could make your part just barely fit...the next largest standard size of stock material would not.
          If the stock could fit, you would not be able to raise your cutter high enough to reach the outher diameter. At least not the electronic 3D touch probe (that is much longer then most cutters).

          Idea

          So the idea was to build a special purpose CNC mill just for parts on the rotary axis.
          It does not need a Y axis at all but a chuck with a large diameter on the 4th axis.
          I was inspired by the Rotary CNC (movable tailstock) and the Farm OX (horizontal spindle)

          • Use a chinese 130mm chuck with 1:20 gears as a 4th axis.
          • No automatic tool change needed because it doesn't do general purpose work.
          • Use Openbuilds C-Beam with trapezoidal spindles (you can't buy these with ball screws off te shelf).
          • paired with high powered stepper motors for acceleration.
          • Add some end-stops and an electric touch plate for tool-length.
          • Use the existing stepper drivers, Mach4 USB breakout board and power supply of my old, mobile 400x300mm CNC machine.
          • Use either the 2.2KW water cooled chinese spindle with RS485 controlled VFD (left over from the ATC upgrade) or a 200W DC spindle (lightweight and easy to accelerate).

          Since the C-beam is trivial to assemble and all the other parts are already here,
          this SHOULD be a fairly quick and straightforward build.

          Photos


          ...more soon

          Design


          1. The long X-axis uses a 1m C-beam ACME assembly with the XL gantry plate and a huge 4.2A stepper motor for maximum acceleration and thus direction-changes.
          2. There is no Y axis.
          3. The short Z-axis on top uses a 250mm C-beam ACME assembly with the extra-long gantry plate.
          4. A secondary X guide-rail in the front with a custom, 3D printed, extra-wide but not extra-long gantry plate stabilizes the Z axis and keeps it square to X.
          5. A 300W DC spindle with ER11 collets is enough for the soft materials this machine will encounter. It is also sufficiently silent. (a major consideration)
          6. Custom, 3d printed mounts for spindle, A-axis and tailstock complete the setup.

          Lessons learned

          • Keep the oil-release screw accessible when designing a mount for a gearbox.
          • Openbuilds gantry plates can rotate slightly when presented with some force on a long, sideways lever. So a second, guiding rail and custom wide plates are needed to make the machine stiffer.
          • The Openbuilds ACME screws are performing surprisingly well compared to ballscrews.
          • The worm gear I used was of very bad casting quality and gets very loud in constant rotation. So instead of machining parallel to the A axis, I need to do it parallel to the X axis. This way X moves all the time but A only every few seconds for a short step.
          • Helical toolpathes in my version of Deskproto 7 seem to not render. The issue is being investigated and should be fixed soon.
          • I need to finish the custom mount for the tailstock quicker then I anticipated.
          • During an accidental plunge the modular Z axis proved surprisingly durable and very easy to dismantle, readjust and assemble again.
          • Always check for loose wires to your stepper drivers when things start to vibrate for the first time. ;)
          • My Z axis is too long but I could not get C-beam assemblies shorter then 250mm.

          Next steps

          I'm currently finishing the soundproof enclosure.

          I'm currently adjusting my existing 4th axis, inductive homing sensor to the new 4th axis. At this time I only have home+limits on both linear axis.

          I already ordered brushes to separate the axis from the machined parts and keep shavings out of the horizontal Z-axis.

          I already ordered a proper guide-rail to replace that silver Openbuilds -contraption. This is fine for some first test-cuts but I don't want to re-tighten the wheels every few weeks.

          Links:


          2018-03-18

          More dust collectors

          Project history

          1. Previous project: Testing the Kreg K5 Master System
          2. current posting
          3. Next project: ...


          After I had designed the dust collector adapter for the Kreg K5 Master System
          to Kärcher and Festool 36mm hoses, I had to go on and make some more:

          Kärcher/Festool to Makita PJ7000J Lamello/Biscuit Joiner router


          The local FabLab had a Makita biscuit joiner that didn't fit the local Festool shop-vacs.
          So I quickly adjusted the diameter and labeling.
          (Hooray for parametric CAD.)

          Kärcher/Festool to Bosch GKS 12V-26


          The new 12V battery operated circular saw is making quite a mess.
          So for it's cute, tiny dust-collection part I made an adapter too...

          Links:

          2018-02-13

          Bonaverde: testing Henry Hück

          Project history

          1. old posting: 'roast only' on the Bonaverde - Familia Alfaro
          2. current posting
          3. next posting: Bonaverde - Emulating NFC cards


          This time I tried
          Bean Type:  not specified
          Process "natural"
          Grown by Henry Hück
          of Nicaragua
          Store: Bonaverde Store entry for these beans


          This is one of the larger bean packs I got from a coffee delivery for my Bonaverde Berlin roast+grind+brew coffee machine.

          Results I

          I used: roast+grind+brew via the alpha version of the "Coffee Concierge" Facebook Messenger Chat bot.
          No extra time after roasting for CO2 could be released.

          I used  600ml of freshly filtered water.

          filter coffee

          Result:
          At first I got the same, distinct sour taste along both sides of the tongue,
          that I seem to get with all coffee I try. I can't get rid of it.
          After a while I cleaned my mouth with filtered water. Used a fresh glass and tried again.
          The sourness is only very faint and in the back of the mouth
          but sadly it's the only taste I can find apart from the obvious.
          Given the horrible results I had before, this however is a great success.
          I will have to find out wether to attribute it to the green beans, the roasting profile belonging to these beans, the slightly cool glassware I used instead of my regular earthen coffee mugs or whatever.

          PS: Obviously it still gets sour quickly when it has cooled down. Like any coffee.

          Henry Hueck | Coffee Producer from Bonaverde on Vimeo.

          2018-02-11

          3D models of Küpper workshop furniture

          Project history

          1. Previous project: name with link
          2. old posting with link
          3. current posting
          4. next step
          5. Next project: designing a chain link tool library
          6.  


          I modelled some of the Küpper workshop furniture elements in Alibre Design
          for the purpose of planning the layout of a workshop in 3D.
          The meassurements are taken from the assembly instructions.
          Some thicknesses that are not important for planning are guesswork.

          Links:

          ´

          2018-01-27

          Setting up an OpenHab with a Homematic CCU2

          Project history

          1. Previous project: name with link
          2. old posting with link
          3. current posting
          4. next step
          5. Next project: designing a chain link tool library

          Purpose:

           I want to:
          • meassure the energy consumption of an air dehumidifier that I have running in the hobby workshop.
          • Meassure moisture, temperature and maybe even CO2 around the house.
          • Control the heating via my Google Calendar (because it shows when I'm away).

          Chosen hardware:

          • Homematic parts for energy consumption and heating. 
          • I could have chosen a DIY alternative for the Homematic CCU2 but that was too much DIY for a first step that already involved way too many things I was not yet familar with.
          • Alternartive parts for energy consumption that are not completely DIY (safety) are not fully supported by EasyESP yet.
          • EasyESP on ESP8266 with various sensors and actory via MQTT at a later point.

          Setting up OpenHabian

          Straightforward.
          HOWEVER, do NOT edit anything in the openhab.config except maybe the Wifi password.
          Else it will not boot.
          (Either that or I had a broken flash the first time.)

          Setting up Homematic with OpenHab


          There is a very nice tutorial, that I was following.
          Sadly there is one thing it is missing out on.
          The CCU2 has a firewall-setting in
          Einstellungen->Systemsteuerung gibt es einen Punkt “Firewall konfigurieren”,
          By default 192.168.0.0/24 is in there but if you are using e.g. 10.x.x.x, you have to enter the address of your OpenHab there.
          Because it's also not mentioned in the Homematic manual, I was at the brink of throwing this out the window, shortly before I found it.

          I'll probably not use Homematic in the long run and switch to Z-wave instead.

          Meassuring energy consumption with OpenHab

          I had another tutorial to follow here....and gave up on it.
          It is written for an OLD version.
          This /etc/openhab2/services/rrd4j.cfg  looks much better
           
          Strategies {
           everyMinute : "0 * * * * ?"
             everyHour : "0 0 * * * ?"
              everyDay : "0 0 0 * * ?"
          }

          Items {
           // all items, all updates
           * : strategy = everyUpdate, everyMinute
          }

          Graphs

           I did not get graphs to work until I added a
                  service=
          to each and every Chart in my sitemap. Then it suddenly worked.


           Links:

          2017-11-19

          ATC: MACH3 M06 tool change macro for USOVO

          Project history

          1. Evaluating my choices in  back in February
          2. Decided on what ATC system to get in March. (posting contains MACH3 software references)
          3. The Usovo spindle and parts finally arrived in April
          4. Mounting spindle and cables in May
          5. Defining M06 tool change macro
          6. Next project: designing a chain link tool library

          I managed to get my automated tool changer to work.
          Due to a compressor failure and missing part to get the new compressor operational, this was delayed FOR A LONG TIME.
          It was a few minuted before I had to leave, so sorry for the crappy cellphone video.
          (Also the youtube "stabilize video" algorithm makes my feed drunk.)
          It's also still in debugging mode with a very low feedrate and a "continue"/"abort" question at every step in case something doesn't fit.
          I also haven't done any tool length probing yet.
          The front side of the tool magazine is too low because it sits on a temporary mount for the 4th axis that I am about to replace with a thicker version machined from POM. However for that I need the ATC to work.


          Discussions:


          Sources:

          Screens

          First we need to place a new user-defined DRO "1212" on one of the screens. It holds the OLD TOOL. This can be done with the mach3screen.exe screen- editor.
          It is assigned at the end of the last M6End.m1s macro.

          Code

          M6Start.m1s

          'M6 start macro with auto tool touch off

          'M6Start.m1s
          'Check all axes referenced
          If (GetOemLed(807) Or GetOemLed(808) Or GetOemLed(809)) Then
             Message(" Please Home Machine before Tool Change")
          
             'Cycle Stop
             ' Button 3 - select Toolpath screen
             DoButton(3)
          
             Exit Sub
          End If
          
          
          '--------------- CONFIGURATION
          
          ' the X+y+z position of tool #0 is stored in DRO 1200, 1201, 1202
          ' THESE USER-DEFINED DROS MUST BE DEFINED IN THE SCREEN SET
          ' distance of tools inside the magazine along the Y axis
          TOOLDISTANCE = 33.5
          TOOLDISTANCE_Z = (33.5-36.5)/5
          TOOLCHANGE_FEEDRATE = 150
          
          ' safe absolute Z position
          SafeZ = 0
          SafeX = 65
          
          ' position of the tool height sensor (magazine must be open)
          THS_POS_X = 0
          THS_POS_Y = 0
          THS_POS_Z = 0
          THS_PROBE_FEEDRATE = 5
          
          ' Thickness of touch plate in the offset-screen
          PlateThickness = GetOEMDRO(1001)
          
          
          '--------------- CURRENT PARAMETERS TO RESTORE
          
          ' Save the current feedrate.
          CurrentFeed = GetOemDRO(818)
          
          ' Save current coordinate mode to restore it later
          oldCoordinateMode = GetOemLED(48)
          
          ' Set absolute coordinate mode and feedrate
          Code "G90 F" & TOOLCHANGE_FEEDRATE
          
          ' Save the current position
          ' WARNING, THESE DROS ARE DEPRECATED SINCE MACH3 1.90
          CurrentPosX = GetDro(0)
          CurrentPosY = GetDro(1)
          CurrentPosZ = GetDro(2)


          '--------------- TOOL CHANGE
          
          tool = GetselectedTool()
          oldTool = GetCurrentTool() 'GetOEMDRO(1212)
          If oldTool = tool Then
            Answer = MsgBox("old tool and new tool are identical", 0 + 16 )
            Exit Sub
          End If
          
          Answer = MsgBox("experimental tool change from tool " & oldTool  & " to new tool " & tool, 0)
          
          
          DoSpinStop()
          
          ' use the user LED to store the state of coolant,
          ' so it can be restored in M6end.m1s
          If getoemled(13) Then
             'OEM LED 13 = "Flood LED" thus coolant is on
             ' set user led on
             setuserled(1000,1)
             Code "M9"
          Else
             'coolent is off
             ' set user led off
             setuserled(1000, 0)
          End If
          
          'Get the tool change pos from the settings page
          ChangeX    = 24                             '=GetOEMDRO(1200)
          ChangeYold = 35 + (oldTool * TOOLDISTANCE)  '=GetOEMDRO(1201) + (oldTool * TOOLDISTANCE)
          ChangeYnew = 35 + (Tool    * TOOLDISTANCE)  '=GetOEMDRO(1201) + (tool * TOOLDISTANCE)
          ChangeZold = -33 + (oldTool * TOOLDISTANCE_Z)                            '=GetOEMDRO(1202)
          ChangeZnew = -33 + (Tool * TOOLDISTANCE_Z)
          
          While IsMoving ()
          Wend
          
          '===== DEBUG====
          Response = MsgBox ( "moving to Zsafe=" & SafeZ & " quickly", 1 )
          If Response = 2 Then ' Cancel pressed
             End
          End If
          '===== DEBUG====
          
          ' G53 = Move in absolute machine coordinate system
          Code("G00 G53 Z" & SafeZ)
          While IsMoving ()
          Wend
          
          ' open magazine
          ActivateSignal(OUTPUT2)
          
          
          If CurrentPosX < SafeX Then
               '===== DEBUG====
             Response = MsgBox ( "We are above the tool magazine, moving to SafeX=" & SafeX & " quickly" , 1 )
             If Response = 2 Then ' Cancel pressed
                Response = MsgBox ( "Aborting" , 1 + 16 )
                End
             End If
             '===== DEBUG====
          
          
             ' go to old tool position in Y
             Code("G00 G53 X" & Safex)
             While IsMoving ()
             Wend
          
               '===== DEBUG====
             Response = MsgBox ( "moving to y_oldtool=" & ChangeYold & " quickly", 1 )
             If Response = 2 Then ' Cancel pressed
                Response = MsgBox ( "Aborting" , 1 + 16 )
                End
             End If
             '===== DEBUG====
          
          
             ' go to old tool position in Y
             Code("G00 G53 Y" & ChangeYold)
             While IsMoving ()
             Wend
          
             
          Else
            '===== DEBUG====
             Response = MsgBox ( "moving to y_oldtool=" & ChangeYold & " quickly", 1 )
             If Response = 2 Then ' Cancel pressed
                Response = MsgBox ( "Aborting" , 1 + 16 )
                End
             End If
             '===== DEBUG====
          
          
             ' go to old tool position in Y
             Code("G00 G53 Y" & ChangeYold)
             While IsMoving ()
             Wend
          
               '===== DEBUG====
             Response = MsgBox ( "moving to SafeX=" & SafeX & " quickly", 1 )
             If Response = 2 Then ' Cancel pressed
                Response = MsgBox ( "Aborting" , 1 + 16 )
                End
             End If
             '===== DEBUG====
          
          
             ' go to old tool position in X
             Code("G00 G53 X" & Safex)
             While IsMoving ()
             Wend
          
             
          End If
          
          
          '===== DEBUG====
          Response = MsgBox ( "Moving down to ChangeZold=" & ChangeZold & " quickly" , 1 )
          If Response = 2 Then ' Cancel pressed
             End
          End If
          '===== DEBUG====
          
          
          ' go to old tool position in Z
          Code("G00 G53 Z" & ChangeZold)
          While IsMoving ()
          Wend


          '===== DEBUG====
          Response = MsgBox ( "Placing tool in X=" & ChangeX & " slowly" , 1 )
          If Response = 2 Then ' Cancel pressed
             End
          End If
          '===== DEBUG====
          
          
          ' go to old tool position in X
          Code("G01 G53 X" & ChangeX & " F" & TOOLCHANGE_FEEDRATE)
          While IsMoving ()
          Wend
          
          '===== DEBUG====
          Response = MsgBox ( "releasing the old tool" , 1 )
          If Response = 2 Then ' Cancel pressed
             End
          End If
          '===== DEBUG====
          
          
          ' release the old tool
          ActivateSignal(OUTPUT1)
          
          '===== DEBUG====
          Response = MsgBox ( "moving up to SafeZ slowly" , 1 )
          If Response = 2 Then ' Cancel pressed
             End
          End If
          '===== DEBUG====
          
          ' move up
          Code("G01 G53 Z" & SafeZ & " F" & TOOLCHANGE_FEEDRATE)
          While IsMoving ()
          Wend
          
          
          '===== DEBUG====
          Response = MsgBox ( "moving over to y=" & ChangeYnew & " quick", 1 )
          If Response = 2 Then ' Cancel pressed
             End
          End If
          '===== DEBUG====
          
          
          ' go to old tool position in Y
          Code("G00 G53 Y" & ChangeYnew)
          While IsMoving ()
          Wend
          
          '===== DEBUG====
          Response = MsgBox ( "lowering to Znew" & ChangeZnew & " slowly", 1 )
          If Response = 2 Then ' Cancel pressed
             End
          End If
          '===== DEBUG====
          
          ' move up
          Code("G01 G53 Z" & ChangeZnew & " F" & TOOLCHANGE_FEEDRATE)
          While IsMoving ()
          Wend
          
          '===== DEBUG====
          Response = MsgBox ( "grabbing the new tool" , 1 )
          If Response = 2 Then ' Cancel pressed
             End
          End If
          '===== DEBUG====
          
          
          ' release the old tool
          DeActivateSignal(OUTPUT1)
          
          
          '===== DEBUG====
          Response = MsgBox ( "moving to  SafeX=" & SafeX & " slowly", 1 )
          If Response = 2 Then ' Cancel pressed
             End
          End If
          '===== DEBUG====
          
          
          ' carry the tool out
          Code("G01 G53 X" & SafeX & " F" & TOOLCHANGE_FEEDRATE)
          While IsMoving ()
          Wend


          '--------------- TOOL HEIGHT PROBE
          Response = MsgBox ( "Would you like to set your Z height automatically? If so, click OK", 1 )
          If Response = 1 Then
          ' TODO THIS HAS NOT BEEN TESTED YET
          
          
            ' go to tool height sensor position
            Code "G00 G53 X" & THS_POS_X & "Y" & THS_POS_Y
            While IsMoving ()
            Wend
          
            While GetOemLed (825)=0
                Message ("(Z-Plate is grounded, check connection and dismiss this dialog)")
            Wend
          
            Code "G31 Z-5 F" & THS_PROBE_FEEDRATE
            While IsMoving()
            Wend
          
            'dwell for 0.25 seconds 
            Sleep(250)
          
            ZProbePos = GetVar(2002)
          
            'Go back to touch position (G31 backs off after touch)
            Code "G0 Z" & ZProbePos
            While IsMoving ()
            Wend
          
            'Set Z axis position DRO to touch plate thickness
            ' WARNING, THIS DRO IS DEPRECATED SINCE MACH3 1.90
            Call SetDro (2, PlateThickness)
          
            'Pause 0.5 seconds for Dro to update.
            Sleep(500)
          
            ' go up again
            Code "G00 G53 Z" & SafeZ
            While IsMoving ()
            Wend
          
            Code "(Z axis is now zeroed)"
            ' restore the original feedrate
            Code "F" & CurrentFeed
          End If
          
          SetCurrentTool( tool )
          
          ' close magazine
          DeActivateSignal(OUTPUT1)
          
          
          '--------------- RESTORE ORIGINAL PARAMETERS
          
          ' Reset coordinate mode to original value
          If AbsMode = 0 Then
             Code("G91")
          End If
          
          '===== DEBUG====
          'Response = MsgBox ( "moving to back to " & CurrentPosX  & " - " & CurrentPosY &" , then Z=" & CurrentPosZ , 1 )
          'If Response = 0 Then ' Cancel pressed
          '   End
          'End If
          '===== DEBUG====
          
          ' go to old tool position
          'Code("G00 G53 X" & CurrentPosX & "Y" & CurrentPosY)
          'While IsMoving ()
          'Wend
          ' go to old tool position
          'Code("G00 G53 Z" & CurrentPosZ)
          'While IsMoving ()
          'Wend
          
          
          ' Reset feedrate to original value
          Code("F" & CurrentFeed)            


          M6End.m1s


          'M6End.m1s
          tool = GetDRO(24)
          oldTool = GetOEMDRO(1212)
          
          ' check user led
          If getuserled(1000) Then
             'coolant was on
             Code "M8"
          End If
          
          If (oldTool <>  tool) Then
             SetOEMDRO(1212, tool)
          End If