
2011-10-27
Makerbot still failing
I tried the Thing-o-Matic again.
5 perfect layers, then suddenly skipping, only thin, uneven streams filament dripping out every now and then and jut utter chaos.
I'll clean nozzle and PTFE-tube with acetone for 4 days. Then try again.
I suspect my PTFE-tube to be too wide for this filament.
As the print progresses the heat travels up and the filament widenes as there is room for it to widen.
Will try again on tuesday night.


Projects in wiki
I updated the wiki that I use to keep notes.
It now reflects the projects I'm currently actually working on and their links and notes.
I don't want anything to get lost. ;)
I was looking forward to building the new shoulder rig, however the chinese parts I wanted to start with have just been returned because of "unsuccessful delivery" after 14 days in customs.
(I did not get a notification from customs or postal services and without such notification I can't show up at customs because it contains the required code-number of the delivery.)
- The Wiki
- All Videos (please subscribe)
2011-10-25
printers out of order
In case anyone is wondering, why I don't post any new 3D designed objects lately:
Both my printers are currently out of order.
With the Thing-o-Matic something is wrong with the nozzle and I'm trying to clean it.
My Repman's heated build platform MK2 has not survived moving into the new house but I haven't started building an MK3 yet.
I do have a number of ideas and untested designs but I'll not post them until I have actually build and tested them.
2011-10-21
Stage box
And the final thing I took apart tonight:
A simple stage-box with 6 XLR female connectors, one thick 10 meter cable ending in 6 XLR male connectors.
The idea here is to replace 4 of the XLR female connectors with combined XLR+6.3mm ones to make this more versatile and to add 2 1/4" swivel-heads to mount microphones or a camera directly onto the box.
(You get these heads for cheap as mountings for security cameras.)
The swivel-heads shall double as a helper to keep the cable organised when not in use.
...maybe I'll come up with something to put into the mostly empty box.
Lots of wasted space that can be put to good use.
Maybe store adapters in there or batteries.
 (click on the photo to see more.)
Update: the finished modification
A simple stage-box with 6 XLR female connectors, one thick 10 meter cable ending in 6 XLR male connectors.
The idea here is to replace 4 of the XLR female connectors with combined XLR+6.3mm ones to make this more versatile and to add 2 1/4" swivel-heads to mount microphones or a camera directly onto the box.
(You get these heads for cheap as mountings for security cameras.)
The swivel-heads shall double as a helper to keep the cable organised when not in use.
...maybe I'll come up with something to put into the mostly empty box.
Lots of wasted space that can be put to good use.
Maybe store adapters in there or batteries.
(click on the photo to see more.)
Update: the finished modification
E27 230V camera -flash light bulp
And the next thing to take apart today....
These devices are cheap and often included if you buy a light-stand or umbrella on ebay.
They have a number of problems that I am trying to solve by modifying it:
The PCB seems to be well labeled and the parts trivial to identify and large enough to solder.
I just need to be careful about all the traces that carry 230V.
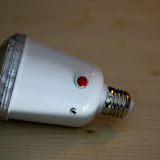
(click to see the other photos) Looks like 130V AC is fed through diodes and a 0,2KOhm resistor (left side on this photo) labeled "200RJ" and "10 Watt" into 3x 275V 220uF capacitors. I guess replacing that giant resistor with a variable one that I can control with a knob could allow me to reduce the power in the capacitors and thus the power of the flash.
These devices are cheap and often included if you buy a light-stand or umbrella on ebay.
They have a number of problems that I am trying to solve by modifying it:
- The light-sensor can't be switched off, so this thing flashes when other prople then you try to take a photo with a flash. => I'll add a switch for that.
- You can't control the brightness. => I'm trying to come up with a way to do that. Have to talk with some people on how to do this.
- Your equaly cheap RF receiver will dangle off the side => I'm trying to include the PCB of these wireless flash triggers into the case and add a hot-shoe to the case in the process.
The PCB seems to be well labeled and the parts trivial to identify and large enough to solder.
I just need to be careful about all the traces that carry 230V.
(click to see the other photos) Looks like 130V AC is fed through diodes and a 0,2KOhm resistor (left side on this photo) labeled "200RJ" and "10 Watt" into 3x 275V 220uF capacitors. I guess replacing that giant resistor with a variable one that I can control with a knob could allow me to reduce the power in the capacitors and thus the power of the flash.
MicPlugUSB
Tonight is the night of taking-things-apart. :)
I started with a T.Bon MicPlug USB that I got in an already opened packaging cheaper then the original low price tag.
It's not intended to be taken apart at all. That much is obvious.
But my plan here is to scrap most of the electronics anyway.
I want to keep the USB 5V to 48V phantom -power supply,
add a second XLR-connector to the end that formerly held all the cables,
move the USB-port to the side and
attach an unbalanced cable with a 2.5mm stereo to the side.
(Without the buttons there are enough holes for that.)
The resulting tube shall then allow me to connect 1 or 2 phantom powered microphones to my digital camera.
The USB-power shall come either from a battery-grip or one of these cheap USB-battery-packs.
(USB has emerged as the one universal power connection that is always avaliable.)
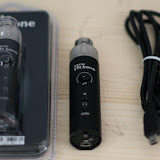 (Click the photo to see all the other photos.)
I started with a T.Bon MicPlug USB that I got in an already opened packaging cheaper then the original low price tag.
It's not intended to be taken apart at all. That much is obvious.
But my plan here is to scrap most of the electronics anyway.
I want to keep the USB 5V to 48V phantom -power supply,
add a second XLR-connector to the end that formerly held all the cables,
move the USB-port to the side and
attach an unbalanced cable with a 2.5mm stereo to the side.
(Without the buttons there are enough holes for that.)
The resulting tube shall then allow me to connect 1 or 2 phantom powered microphones to my digital camera.
The USB-power shall come either from a battery-grip or one of these cheap USB-battery-packs.
(USB has emerged as the one universal power connection that is always avaliable.)
(Click the photo to see all the other photos.)
2011-10-16
more progress in wprkshop
I did some more progress in the creations of my workshop.
The hole-boards are now mounted.
(Easy to notice as only half as many tools are now lying around.)
They don't attach to the wall but to the table because drilling holes into *this* wall is a nightmare.
I also finalized the electrical work.
The outlets are now neatly seated along the walls.
I have no clue how to mount my 3 sets of hex-keys to the wall yet.
(metric, imperial and torx)

- Photos (coming soon)
- All Videos (please subscribe)
2011-10-15
Workshop
I'm slowly making progress in building my workshop.
After installing the Basotect foam via Power Strips failed, I now tried nails.
They sort of work but it's not very good.
I also found a cheap compressor+limiter+expander+de-esser on eBay and modified the 19" mounting to mount it below the table in the "documentation" corner.
(Just between the "electronics" and the "mechanics" section of the workshop. ;)


After installing the Basotect foam via Power Strips failed, I now tried nails.
They sort of work but it's not very good.
I also found a cheap compressor+limiter+expander+de-esser on eBay and modified the 19" mounting to mount it below the table in the "documentation" corner.
(Just between the "electronics" and the "mechanics" section of the workshop. ;)
- Photos
- All Videos (please subscribe)
2011-10-14
sound proofing my workshop
I want to line the walls of my small workshop with Basotect -foam.
The plan was to use Tesa Power-Strips to attach them to the walls and be able to remove them 10 years later.
Problem: It looks like the Power-Strips/Poster-Strips dont stick to the foam. They work fine on any other surface in the room but not the foam. :/
2011-10-12
converting an XLR stage box
I think I'll attach 2 small swivel -mounts designed for security cameras to stage-box (a small box with 6 XLR-sockets attached to a single 10m cable that ends in 6 matching XLR-plugs. Designed to reduce cable-clutter on a stage).
That way I can mount 2 shotgut-microphones or one camera and a microphone directly to that box.
I would be at the back (at the other end of the 10 meter cable or with some extension-cord inserted) with a camera and sound recorder
while the microphones face the scene and are not as much in the way as 2 small tripods and lots of cables would be.
Maybe also exchange 2 of the XLR sockets by combined XLR/6.3mm sockets.
More options when hunting for a cable....

- camera-mount
- the stage box
- Photos (coming soon)
- Video (coming soon)
- All Videos (please subscribe)

2011-09-28
Status of camera accessory projects
Another train ride.
Too cramped to continue with my 3d printed tripod on the laptop.
As for the 3d printed super battery grip for the GH1/GH2 , I'll probably leave out the phantom power and just provide USB power out for space reasons.
Then modify a cheap XLR2USB cable to take USB power and provide 2.5mm stereo out for the camera.
That is much more flexible to use and has even less weight and bulk to carry.
I ordered a cheap Chinese copy of a foldable camera rig that I want to modify to carry an optional rod system and microphone mounts.
Making a custom bag for it, I could have a lightweight shoulder rig that I can take straight out of the bag and be ready within seconds.
I'll probably have to replace all the cheap bolts and custom make the missing front support but being able to create any custom shape on the 3D printers, that should actually be fun.
2011-09-27
First draft: 3d printed carbon tripod
On the train ride today I designed the very first sketch of a 3d printed tripod for heavy loads.
It shall be made of CFK = carbon fiber.
The rods seem to go for a sum of <100eur for 2x3 rods per leg.
Way less then what even a light CFK tripod costs.
And I have the option of adding mounts for sound recorder, microphones, cables, batteries,...
directly into the design of the tripod.
(e.g. sitting next to the fully extracted tripod on a chair and having the remote control on one of the legs.)
A first search turned up 10x9x1000mm CFK tubes for 5,71eur (4,70eur).
That would be 102,78eur(84,60eur) + some plastic, nuts and bolts for the entire tripod. (No head)

- 3D PDF file (click "File->Download Original to get it in 3D, Google Docs does not allow me to link to the original file but cannot display 3D content itself)
- Design files on Thingiverse (coming soon)
- Photos (coming soon)
- Video (coming soon)
- All Videos (please subscribe)

2011-09-24
phantom powering batery grip
I got the idea to add 2 6.3mm sound connectors to my battery grip since XLR is physically too large but XLR to 6.3mm is common.
The battery grip needs to connect to the microphone+remote shutter port of the camera anyway for the shutter button to work.
The grip would add the ability to connect microphones that need phantom power without having to sync external audio from the Zoom H4n recorder.
I got me one PP2B, thinking that without the XLR-connectors and the battery the electronics should be very small and possibly insert-able into my Battery grip.
Well....the electronics are small. But distributed over an overly large PCB. No way that is going to fit into the battery grip.
So...back to square one. I guess I need to build my own phantom power injector.

 Maybe using an inverter to get >48V from the camera supply voltabge of 7,2-10V and then an TL 783 + 2 resistors would be small enough.
Then have 2 injectors from http://sound.westhost.com/project96.htm (4 zenner diodes, 4 resistors, 2 capacitors per stereo-channel.)
Maybe using an inverter to get >48V from the camera supply voltabge of 7,2-10V and then an TL 783 + 2 resistors would be small enough.
Then have 2 injectors from http://sound.westhost.com/project96.htm (4 zenner diodes, 4 resistors, 2 capacitors per stereo-channel.)


2011-09-23
black PLA arrived
The black PLA for 3d printing just arrived.
They even included some sweets in the package. :)
To get my RepMan running again I'm currently mounting it on an IKEA table that fits 19" equipment.
I'll drill some holes into the table instead of using feet. This should keep the RepMan from moving at high speeds or when there's a know in the filament and the strong stepper motors pull the complete roll of filament up or the printer down.

They even included some sweets in the package. :)
To get my RepMan running again I'm currently mounting it on an IKEA table that fits 19" equipment.
I'll drill some holes into the table instead of using feet. This should keep the RepMan from moving at high speeds or when there's a know in the filament and the strong stepper motors pull the complete roll of filament up or the printer down.
- All Videos (please subscribe)
power for the new workshop
I just installed a box of fast tripping circuit breakers and an additional FI for the workshop.
Each of the 3 sections of the woprkshop "Electronics", "Documentation" and "Mechanics" has it's own 10A circuit breaker and it's own main power switch.
All run through an FI and then into a common power outlet and thus through the 16A circuit breaker that governs that room (including the lights).
So if anything ever breaks, one of these 10A breakers or the FI should trip and the tables are out of power but there is still light in the room to fix the problem.
I do not yet have large, red emergency-off switches and there are not as many power-sockets as I want to end up with and the XLR-cable for the microphone has no hole in the table yet and.....
Oh any my new vice has arrived!
I really like this one.
It can grip objects of any shape and be turned upright.


- Photos (coming soon)
- All Videos (please subscribe)
2011-09-22
I'm planning on finally mounting that dual-head upgrade to my Repman.
That means I need a test-object that is uses 2 different plastics.
so....to not waste any material I designed the HOWTO -logo in Alibre to create a triangle-shaped microphone screen with the black logo.
...in 3d...with the tools reaching over the edge of the actual microphone flag to make it obvious that it's the 3d printed logo of a 3d printing "home-improvement" show.

- Design files on Thingiverse (coming soon)
- Photos (coming soon)
- Video (coming soon)
- All Videos (please subscribe)

[REPORT] Part Time Scientists - Moon Mission (at CCCamp 2011)
Interview with Robert of the Part Time Scientists.
One of the competitors of the Lunar X Price to send a rover to the moon.
Recorded during the Chaos Communication Congress 2011 in Finowfurt Berlin.
- Video
- All Videos (please subscribe)
2011-09-21
I just changed the background of my YouTube channel to reflect the logo I have taken up.
There is quite a lot of new content in the pipeline but moving to the new house is still taking up most of my time and will be for quite a while.
I'm currently planning:

- A 3d printed conversion kit to build a battery grip for the GH1/GH2 camera that contains phantom-power for external microphones, connections for mains-power and to be powered by cheap USB-cellphone-power supplies and to supply USB-power itself (e.g. to my Zoom H4n USB-power-cable
- A 3D printed, 3 dimensional, 2 color microphone flag and a 3d-printed QR-code being printed as a 2-color print as an example of how to use the dual-head modification of the BitsFromBytes RepMan.
- a 3d printed carbon (CFK) ultra-lightweight yet very sturdy camera tripod (3 telescopic segments, 2 rods per leg, cross-supports made from sturdy fabric)
- ....
- All Videos (please subscribe)

2011-09-19
New house and new workshop
I'm slowly getting settled in.
Properly secured electricity for the new workshop is underway.
(3 tables with their own small circuit-breaker,
one FI safery switch for everything except light
and a huge emergency-off always within reach.)
I have tables now and the sound-proofing for walls and ceiling is in the late planning stages.
Table drill (way too large but I like that for accuracy in terms of position and rotational speed) with many ways to adjust it's surface
and a small grinder for cleaning up 3d printed parts are already there.
I still have to decide on a good table-saw.
The large tools can be moved around the room to use them on large things freely.
One table will be reserved for small machine building
with a properly sorted collection of nuts and bolts.
M2-M12 as well as 1/4" and 3/4" in a number of standard sizes.
I'll then try to limit myself to these sizes where ever possible in later designs for the 3d printer.
Another table will be for electronics with a raised stand for soldering station, soldering fume filter, illuminated magnifying glass,... .
In the corner there will be my large microphone to document whatever I'm working on along the way.
Camera mounting points with markers on the tables where the recorded frame ends are also planned.
The room is very small with a low ceiling.
I'll try to sound proof it to protect both my hearing and that of the neighbors.
...still a long way to go but it's slowly taking shape now.

Properly secured electricity for the new workshop is underway.
(3 tables with their own small circuit-breaker,
one FI safery switch for everything except light
and a huge emergency-off always within reach.)
I have tables now and the sound-proofing for walls and ceiling is in the late planning stages.
Table drill (way too large but I like that for accuracy in terms of position and rotational speed) with many ways to adjust it's surface
and a small grinder for cleaning up 3d printed parts are already there.
I still have to decide on a good table-saw.
The large tools can be moved around the room to use them on large things freely.
One table will be reserved for small machine building
with a properly sorted collection of nuts and bolts.
M2-M12 as well as 1/4" and 3/4" in a number of standard sizes.
I'll then try to limit myself to these sizes where ever possible in later designs for the 3d printer.
Another table will be for electronics with a raised stand for soldering station, soldering fume filter, illuminated magnifying glass,... .
In the corner there will be my large microphone to document whatever I'm working on along the way.
Camera mounting points with markers on the tables where the recorded frame ends are also planned.
The room is very small with a low ceiling.
I'll try to sound proof it to protect both my hearing and that of the neighbors.
...still a long way to go but it's slowly taking shape now.
- Photos
- All Videos (please subscribe)
2011-09-17
New Dropbox API
I just received word that Dropbox has finally published version 1 of their API.
I'll have a good look at it one of these days and probably update my Android Dropbox apps.
Of cause this will take a while as I'm still in the process of moving to a new house.
That's also why I haven't written much in the weeks after CCCamp 2011.
I'll have a good look at it one of these days and probably update my Android Dropbox apps.
Of cause this will take a while as I'm still in the process of moving to a new house.
That's also why I haven't written much in the weeks after CCCamp 2011.
Abonnieren
Posts (Atom)